Share this post
Award-winning practice management trusted by more than 10,000 accounting firms
For everything to be on one platform, it’s huge. It costs us less money too. Having everything centralized in TaxDome helps us, and it helps the client.

In business, first impressions matter — and bookkeeping is no different. This is why a smooth, hassle-free onboarding process is so important. As the first interaction with your firm, it sets the tone for the rest of the client relationship.
Too often, however, client onboarding becomes a slow, drawn-out process. For firms, this means time and resources are needlessly wasted. For clients, it means frustration and question marks over their decision to work with you.
In this article, we’ll show you how you can streamline your onboarding process with a bookkeeping client onboarding checklist. We’ll even provide you with some free templates that you can customize!
The benefits of effective bookkeeping client onboarding
An effective client onboarding process can bring all sorts of benefits to your firm and clients. In this section, we’ll highlight some of the most important advantages.
1. Improved consistency
By standardizing your client onboarding process, you can guarantee consistently smooth transitions and high-quality interactions. Your onboarding experience looks and feels the same across all new clients, regardless of personnel changes.
2. Happier clients
Clients now expect seamless digital interactions with service providers — and if you can’t offer that, they’ll find another firm that can. Faster, smoother onboarding means happier clients. And happy clients are more likely to stick around for the long haul.
3. More efficient and scalable processes
By leveraging a practice management platform such as TaxDome, you can automate and streamline the steps involved in client onboarding. This speeds up the process, frees your staff up to focus on more high-value work, and improves the client experience through timely updates. What’s more, your onboarding process can scale seamlessly as your business grows.
A comprehensive checklist for successful bookkeeping client onboarding
A checklist will help you systematize your onboarding process, ensuring that every step is completed in a timely manner and in the right order. In this section, we’ll provide you with a comprehensive checklist that you can apply to your onboarding process, including detailed information about how to implement each step.
1. Engage the client and formalize the relationship
Before we dive into the onboarding process, let’s first discuss how you can formalize working relationships with new clients. For a client to say “yes!” to working with you, they need to know a few pieces of important information, such as:
- What services your firm offers
- How those services are priced
- What clients can expect from working with you
- Formal terms and conditions
There are plenty of software platforms that facilitate this process. TaxDome’s Proposals and ELs feature, for example, enables you to send highly polished, custom-branded proposals and engagement letters where you can promote your firm, outline your services and pricing, and secure payment in one seamless workflow.
From the client side, it’s simple to review the document, accept the terms with an e-signature, and make payment on any device. This kicks off the client relationship in style, showcasing the kind of slick interactions they can expect from your firm going forward.

Gathering client info and docs has never been easier! Request a demo to take our customizable organizers for a spin.
Request demo
2. Send a welcome message
Once the client has e-signed on the dotted line, it’s time to warmly welcome them to your firm. Email is perhaps the most effective channel for a welcome message, although once you are actively working with the client, we recommend more effective communication channels such as secure chats.
To help you craft the perfect welcome message, here are some key elements to include:
- A personalized greeting and introduction
- A brief recap of the benefits of working with your firm
- An outline of the next steps in the onboarding process and what to expect
- Contact details and information about preferred communication methods
- An invitation to your client portal (if you have one)
To streamline the process of sending welcome emails, we recommend using email templates that you can customize to suit each client. With TaxDome, you can access the TaxDome Marketplace, where you can find, download, and use a huge range of templates made by industry experts. These templates cover everything from welcome emails and other client communications to invoices, tasks, folder structures, and even entire workflows.

As we touched on earlier, your welcome email is the perfect opportunity to invite new clients to your client portal, if you are using one — and we strongly recommend that you do! Client portals provide a secure environment where clients can manage all interactions with your firm.
With TaxDome’s client portal, your clients can view, scan, upload, and e-sign documents, complete tasks, communicate with accountants or bookkeepers, and pay bills — on either desktop or our top-rated client mobile app. This transforms the client experience while reducing the time you spend on administrative tasks.

3. Gather information and documentation
Now that your new client has been welcomed to the firm and set up on your client portal, it’s time to gather all the necessary data and documents you need to start working with them. To serve bookkeeping clients, for example, you’ll need to collect:
- Client information
- Financial records
- Tax information
- Information about the client’s software
- Payroll and HR documents
- Vendor and customer information
In the past, this was a somewhat clunky process, involving spreadsheets and other cobbled-together checklists. There was inevitably a lot of back-and-forth communication, as clients failed to submit key pieces of information or documents. But with the right tech, gathering documents and data can be seamless and hassle-free.
There are plenty of systems you can use to streamline this process, from standalone data-gathering tools and form builders such as Typeform or Jotform to practice management systems with built-in questionnaires.
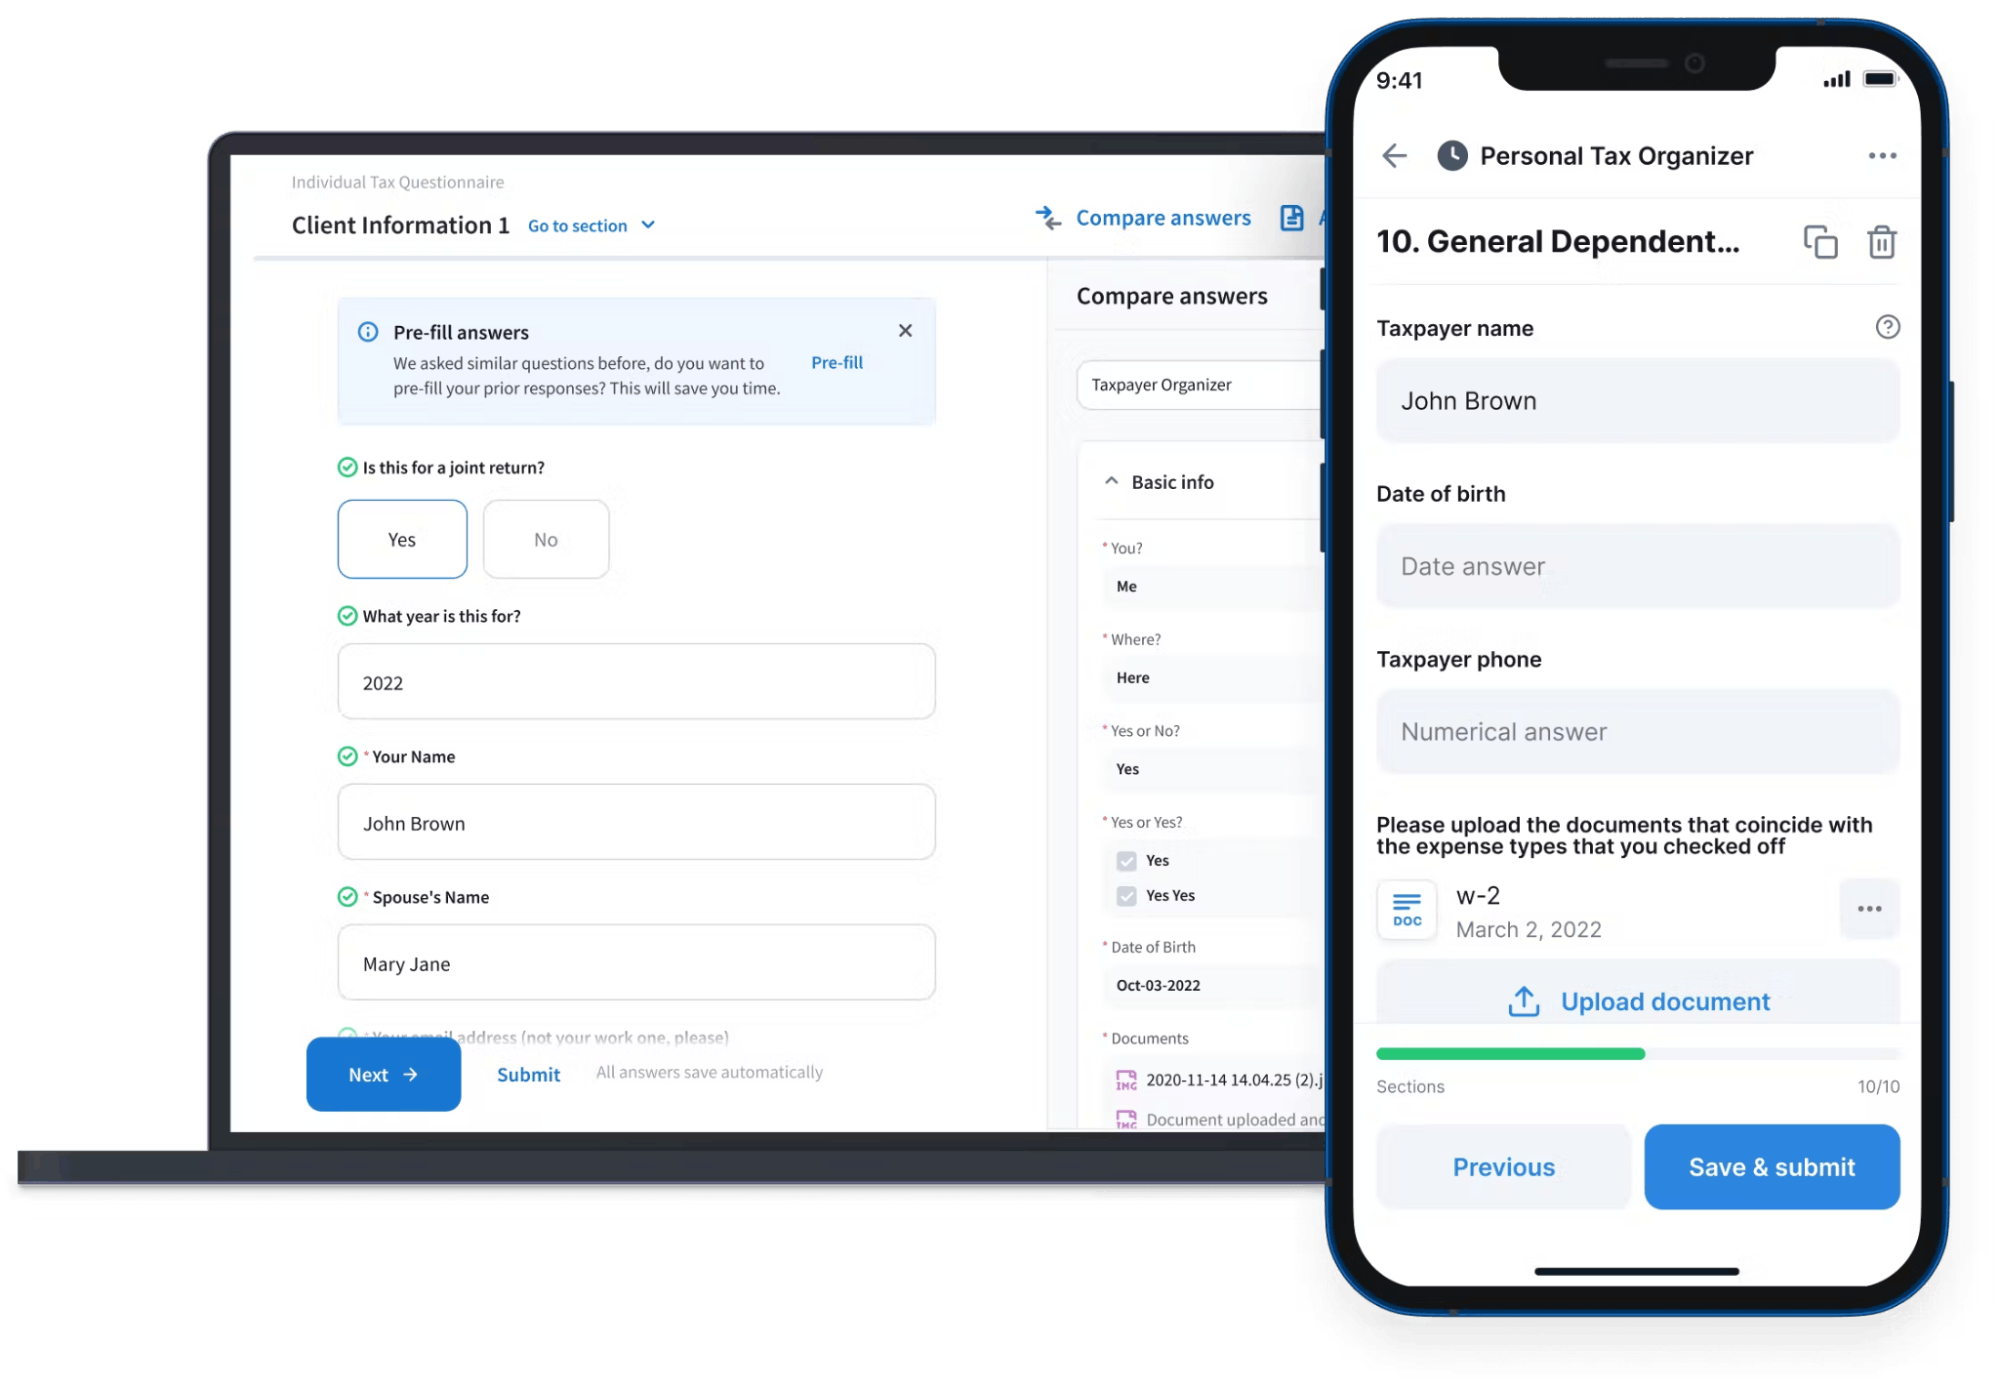
TaxDome comes with customizable organizers — digital forms that you can tailor to your specific needs. These forms guide clients through the process of submitting information and documents step by step, either on desktop or mobile, and come with tons of handy features, including:
- Organizer templates: you can speed up the process by using one of our customizable client onboarding organizer templates
- Conditional logic: questions are hidden or displayed based on the client’s answer to previous questions
- Pre-filled answers: for existing clients, unchanging data such as their name, date of birth, and social security number can be prefilled to save time
4. Review documents and add info to your systems
Once the client has submitted the information and documents you asked for, it’s time to thoroughly review what they provided. If any items are missing, you’ll need to follow up with the client as soon as possible.
Once you have everything you need, you can go ahead and add your client’s information and documents to your systems, including your CRM and accounting or bookkeeping platform. Doing this manually can be time-consuming and prone to error, which is why platforms like TaxDome automate it for you. With TaxDome organizers, client information is added automatically to your TaxDome CRM.

5. Request feedback from the client
By this stage, the onboarding is pretty much done and you’re ready to start working with the client. Now is a good time to ask the client for feedback on the onboarding process, to learn what you’re doing well and what could be improved. Seeking feedback also shows the client that you care about their experience and are committed to continuously improving your service.
To further improve and standardize your onboarding process, check out this article: Bookkeeping client onboarding questionnaire: essential questions and free template for 2024.
New bookkeeping client onboarding checklist templates
In this section, we’ll provide you with two free bookkeeping client onboarding checklists — one for new clients and another for returning ones. The steps and bullet points are just examples, so feel free to add, modify, or remove sections as you see fit.
Template 1: Onboarding new bookkeeping clients
STEP 1. Send proposal and engagement letter
Once the client has agreed to your proposal and formalized the relationship by e-signing the documents and providing payment details, you can move on to step 2. STEP 2. Send a welcome email
Once the client is set up on the client portal, you can move on to step 3. STEP 3: Gather information and documentation
STEP 4: Review documents and add the client to your systems
STEP 5: Request feedback from the client
|
To access this template, click on the link below:
Template 2: Onboarding returning bookkeeping clients
| STEP 1. Review client relationship and send new engagement letter if necessary
If the client already signed an engagement letter that covers the job they want you to do, you can miss this step. If not, you’ll need to send a new engagement letter, including:
STEP 2. Send a “welcome back” email
Once the client is set up on the client portal, you can move on to step 2. STEP 3: Gather information and documentation (if necessary) Ask the client to add or update any information that has changed since you last worked with them, including:
STEP 3: Review documents and add the client to your systems
|
To access this template, click on the link below:
How to automate the client onboarding process
If performed manually, the steps we’ve outlined above end up becoming a time-consuming, error-prone hassle. If you automate them, however, the entire process can unfold seamlessly, with minimal input from your side. At the same time, automation improves the client experience, with each next step in the journey happening exactly when it’s supposed to.
To automate your client onboarding process, you need the right technology. While it’s possible to build automated workflows using different apps for proposals, emails, document gathering, and payments, it ends up being an unnecessarily complex process. The best option is to choose a practice management software that combines all these tools in one place.
With TaxDome, you can automate not just individual onboarding tasks but entire workflows. As the client or accountant completes certain actions, the job moves through different stages of a pipeline, triggering different automations. Here’s an example of how it can work.
- A new job is added to the onboarding pipeline, triggering a proposal to be sent
- Once the proposal is signed and payment details are captured, a welcome email is sent along with an organizer for capturing the client’s information and documents
- Once the organizer is submitted by the client, a task is created for an accountant to review the documents, and a message is sent explaining that the documents are in review
- Once the documents have been reviewed and everything is ready, the client is moved to a monthly bookkeeping workflow, and a message is sent explaining that all the documents have been approved
Below is an example of what a pipeline looks like in TaxDome:
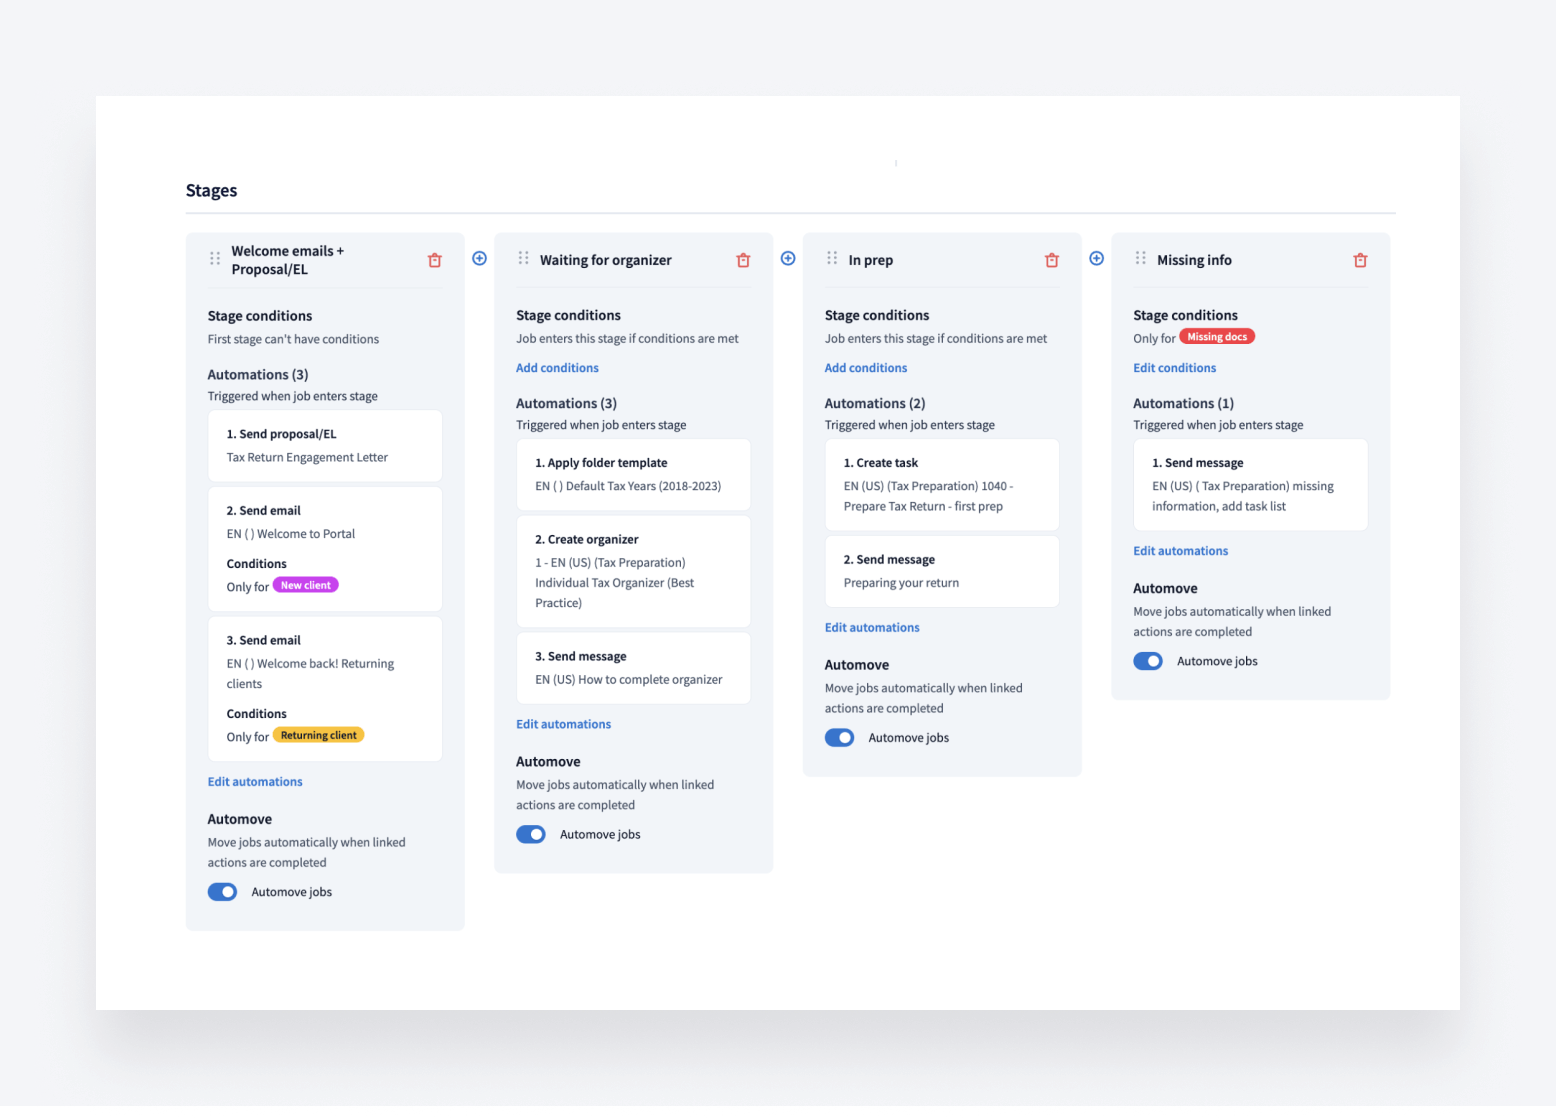
At every step of the process, the client is kept in the loop. The accountant is only called into action when a task is generated that cannot be automated — such as checking and reviewing the submitted documents.
You can use templates for everything — proposals, welcome emails, organizers, invoices, and much more. At the same time, shortcodes enable you to automatically customize email templates, meaning your clients receive personalized emails without you lifting a finger.
For a limited time, switch to TaxDome and unlock up to 6 months free to offset the cost of your current software. Start automating your client onboarding process today.
Explore the offer
What’s more, you can categorize new clients using tags, enabling you to automatically send different emails, organizers, or invoices based on different factors. For example, you might want to use specific welcome emails for individual clients, small businesses, and large businesses.
To learn more about how TaxDome’s workflow automation works across different processes, check out this video:
Deliver an incredible client onboarding experience and save countless hours with TaxDome’s automated workflows.
Request demo
To sum up
Onboarding is a crucial first step in the client journey, laying the foundation for positive and long-standing client relationships — but only if you get it right.
While checklists are a powerful onboarding tool, they aren’t enough on their own. Today, clients expect seamless digital experiences when interacting with bookkeeping firms, not clunky and slow manual ones. To deliver on these expectations, you need the right technology. This is where TaxDome can help.
With TaxDome’s workflow automation, customizable templates, and secure client portal, you can set your onboarding process to autopilot, freeing up your staff from repetitive tasks while ensuring the best possible client experience.
So, are you ready to take your client onboarding to the next level? Request a demo today to see TaxDome in action!

Nicholas Edwards
As a content writer for TaxDome, Nicholas combines a deep understanding of accounting processes with a passion for technology. With years of experience in the accounting industry, he enjoys transforming complex financial and tax concepts into accessible, actionable insights. His writing helps accountants and firms leverage technology to streamline workflows and optimize their practices.
Thank you! The eBook has been sent to your email. Enjoy your copy.
There was an error processing your request. Please try again later.
Discover how top accounting firms are staying ahead in 2025 – download the free guide
What makes the best accounting firms thrive while others struggle to keep up? We analyzed our top 20 TaxDome firms, representing over $100M in combined revenue, to uncover the strategies driving their success.